How to transfer photos from iPhone to iPhone without using iCloud
Tragically, iCloud does not provide its user a great deal of storage capacity, 5 GB that’s all you get, right? In 5 GB iPhone would back up the data, consequently, you won’t have enough storage to sync or transfer data across devices. At such a point, you often think about how to transfer photos from iPhone to iPhone without using iCloud? Well, if you do not want to update your iCloud then there are surely multiple alternatives, you may opt for.
Besides this foremost reason, you may be in a mood of changing your iPhone and buying a new one. But there is one thing that stops you from doing this, and that is how to transfer photos to another iPhone without iCloud. It seems nearly impossible to do so and how can you lose all your data, files, documents, and pictures like that? Pictures incorporate various memories and give us the opportunity to live the small moments all over again, so how can one lose all of it.
Therefore, in this article, I’m going to tell you everything you need to know regarding how to transfer photos from iPhone to iPhone without iCloud, so you may keep your memories intact and safe.
Let me give you a preview of this complete article so you may have an idea what are the possible alternatives you would like to opt-in order to transfer photos from iPhone to iPhone without iCloud. You may choose one of the following and suit your objective:
How to transfer photos from iPhone to iPhone without using iCloud?
Let’s begin and explore multiple alternatives to carry out the objective. Read the article till the end, to get a better understanding of each one of these:
1- Transfer photos from iPhone to iPhone with one click:
- Dr. Fone switch software
- EaseUS MobiMore
- MobileTrans
- Quick start
- AOMEI MBackupper
2- Selective transfer via:
- Dr. Fone phone manager
3- Transfer via iTunes
4- Transfer via airdrop
Transfer photos from iPhone to iPhone through one click:
1. Dr. Fone switch software:
With the help of Dr. Fone switch software transfer of photos can be made within minutes and the good news is that you may not be losing a single image. To carry out this quick transfer all you need to have is two cables and connect both of your iPhones with your Mac and install Dr. Fone and there you are! Follow these guide steps to successfully carry out the transfer:
Step 1: Download and install Dr. Fone switch software.
Step 2: Open the software and you will be able to see the following interface on your screen
Step 3: Now connect your both iPhones, with your Mac and click “SWITCH”
Note: Keep this thing in mind while connecting iPhones with Mac that which one is the source mobile and which one is the destined one. In case you want to swap them then click on “FLIP”
STEP 4: Now click on the option that says “PHOTOS” and then click “TRANSFER”. Henceforth all the photos would be transferred to iPhone without any difficulty and iCloud. It’s quite simple, isn’t it?
2. EaseUS MobiMover
EaseUS MobiMover is efficient data transfer software which allows the user to transfer photos, files, documents, contacts, notes, books, Safari bookmarks, movies, TV shows, videos, music, ringtones, playlists, and audiobooks within seconds. This software is all about convenience, and not only transfers data but it also back up your iPhone without any storage limitations. Therefore, you may easily use this software not only to transfer data but also as a backup tool. Isn’t it cool?
Thus, follow these guidelines to use EaseUS MobiMover:
NOTE:
Before moving towards the steps let me inform you that EaseUS MobiMover is compatible only with PC running Windows 7 and later or Mac running MacOS 10.12 (Sierra), 10.13 (High Sierra), Mac OS X 10.7 (Lion), 10.8 (Mountain Lion), 10.9 (Mavericks), and 10.11 (El Capitan). Therefore, before downloading keep this detail in mind. Now let’s begin
Step 1: First of all you need to download EaseUS MobiMover into your laptop.
While, if you are a Mac user then download EaseUs MobiMover
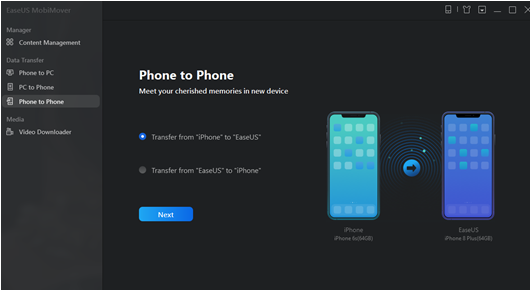
Step 2: You need to connect both your iPhones with laptop. Now click EaseUS MobiMover and run the software. Afterward, click the “PHONE TO PHONE” option from the interface present in front of you. Set your iPhone from which you need to transfer the data as a “SOURCE DEVICE” and set the iPhone as a “targeted one” in which you need to shift all your data. Later on click on “NEXT” to proceed
Step 3: Now choose all the files you need to transfer to the target destination. You may choose photos, videos, contact, music and much more
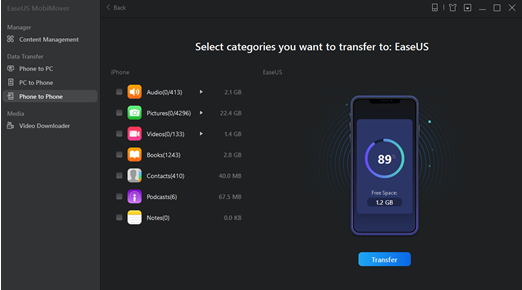
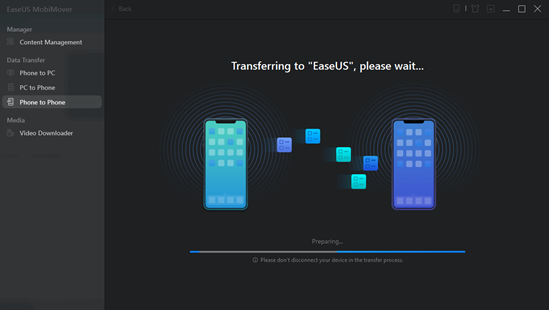
Step 4: Afterwards, click “TRANSFER” so that all the selected files could be transferred into targeted device. The time which would be taken to complete the process would depend on the size of files you have chosen, therefore, wait until the process completes and once it is done you may check whether it is transferred or not
3. MobileTrans-Phone Transfer
It is user friendly efficient software which transfers data across android, iPhone and windows devices without causing any trouble. One of the plus point of this software is that it allows transfer across iPhone to iPhone, Android to iPhone, iPhone to Android, Android to Android, Windows to Android/iOS and vice versa, not only restricting the transfer among iPhone devices only. Furthermore, it has an interface that makes the shift of data extremely easy and provides zero inconvenience to its users. Follow these easy steps to explore this professional software:
Step 1: Download the software Mobile Trans Phone .
Whereas, if you are a Mac user then download it Mobile Trans Phone
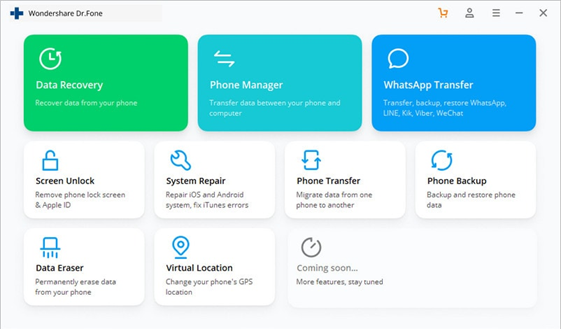
Step 2: After downloading the software, click on the icon and run it. Later on choose “PHONE TRANSFER” from the interface that is present right in front of you.
![]()
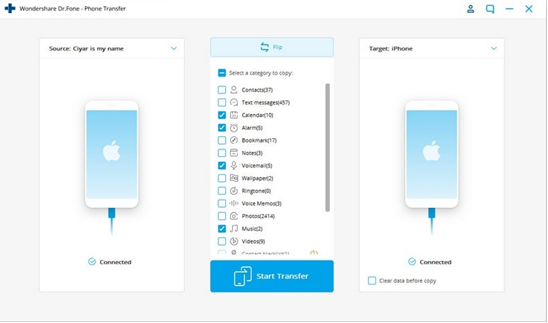
Step 3: What you are going to do now is connect the two iPhones via USB cables. Soon after you would connect them the software would read one of them as a source device and the other one as the destination device. In case, you want to swap the two then simply click “Flip”.
![]()
Step 4: Now, select the files you need to transfer into the destined device and select “START”. Wait until the transfer is completed and do not disconnect the two devices during the transfer is taking place.
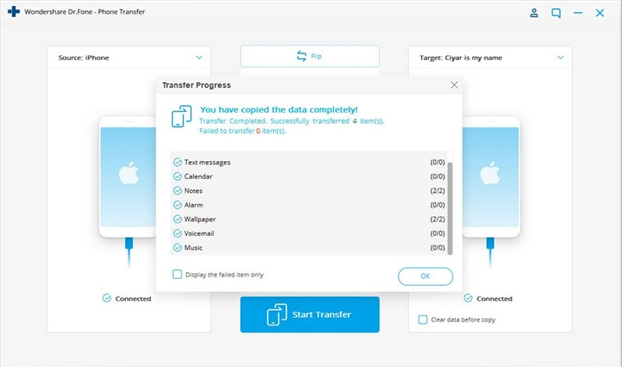
![]()
Step 5: After the process is completed check your destined device whether the transfer has taken place completely or not. And it is done!
4. Quick Start (wireless transfer)
Quick Start is one of the most common ways opted by the users to transfer files or documents. If both the iPhones are iOS 12.4 or later versions then you may use quick start to transfer your files via IPHONE MIGRATION. With the help of this application you may transfer all the desired data wirelessly without needing laptop, which is quite interesting. One thing that you should take care of while transferring the data is that you should not engage any of the iPhone in any other activity, besides running quick start. The process might take some time and it all depends on the size of files you transfer, moreover, an extremely important reminder is that you need to make sure that both your iPhones are charged enough to carry out the procedure.
In order to transfer photos from iPhone to iPhone without using iCloud via quick start follow the following steps:
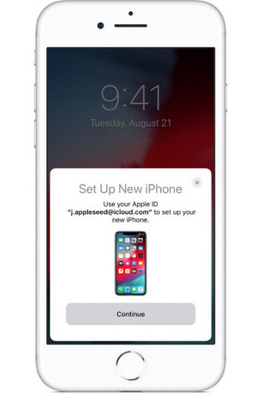
Step 1: In order to transfer the photos among two iPhones you need to keep both of them in near proximity and switch on the Bluetooth. The Quick Start screen will be displayed on the old phone to allow you to set up your new iPhone via Apple ID. Later on enter the Apple id and click “CONTINUE”. Unfortunately if the option is invisible then you need to check your Bluetooth again.
Step 2: Soon after the animation appears on your destined iPhone put your source iPhone over the destined one to ensure the animation is centered in the viewfinder.
Step 3: In case you have been asked to enter password into your destined iPhone then enter the one set for source iPhone.
Step 4: In the last step select the target backup along with suitable restore. Afterwards you will be asked to restore your files from iCloud backup or else you may choose to update the current backup and restore it later on. When required choose transfer settings.
Related articles: How to Cancel iCloud Subscription
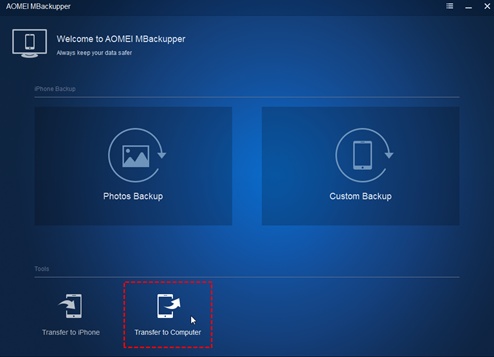
5. AOMEI MBackupper:
Transferring photos from iPhone to iPhone without iCloud seems next to impossible but there are multiple alternatives and one of them is AOMEI MBackupper. It is professional data transfer software which transfers 100 photos with in seconds and an interesting fact about this software is that it provides its customer with indelible experience through its extremely interactive and convenient interface. In order to explore how it works, follow the given instructions:
Step 1: First of all you need to download the software AOMEI MBackupper and later on connect the source iPhone with your laptop via USB cable.
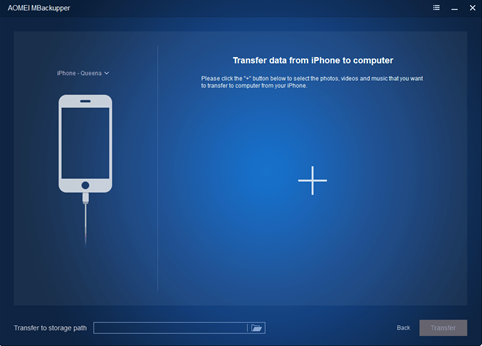
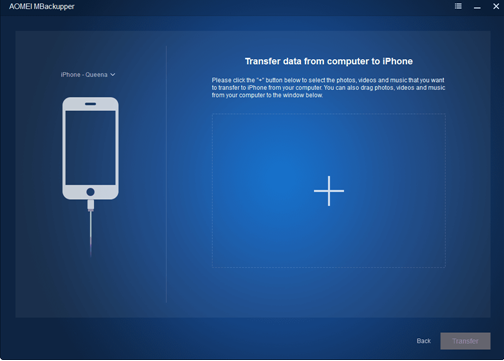
Step 2: Now after opening this software you will be able to view the option of “TRANSFER TO COMPUTER” present at the bottom of your screen.
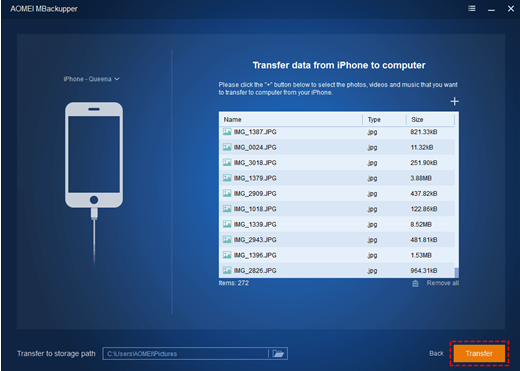
Step 3: Now you need to click on the “PLUS ICON” in order to select the images from your source iPhone and select “OK”.
Step 4: Select “TRANSFER” and soon after the process completes you have to disconnect your source iPhone.
Step 5: later on you have to connect the destined iPhone with your laptop and go to back up management. There, at the bottom of the screen you will be find “TRANSFER TO IPHONE” select the option.
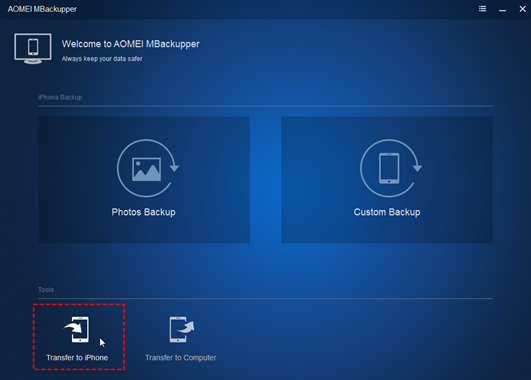
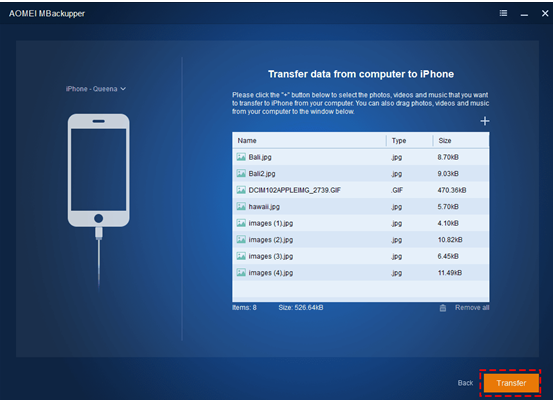
Step 6: Afterwards you need to click “PLUS ICON” and select all the images you just transferred to your computer and click “OK”.
Step 7: Now click “TRANSFER” to shift all your images to the destined phone
Step 8: Finally, your all selected images would be transferred to your destined iPhone without any trouble.
Selective transfer of photos from iPhone to iPhone via Dr. Fone phone manager:
So far you would have had the clue that transferring photos from iPhone to iPhone without iCloud is no big deal. There are several options and sometimes you may need to transfer data selectively rather transferring whole of it. For this purpose all you need is Dr. Fone phone manager, which is one of the most convenient way to transfer selected data among iPhones. It prevent any type of data loss, moreover, it allows its user to not only transfer photos but files, documents, music and what not.
So let’s begin and see how you can take advantage of this professional software:
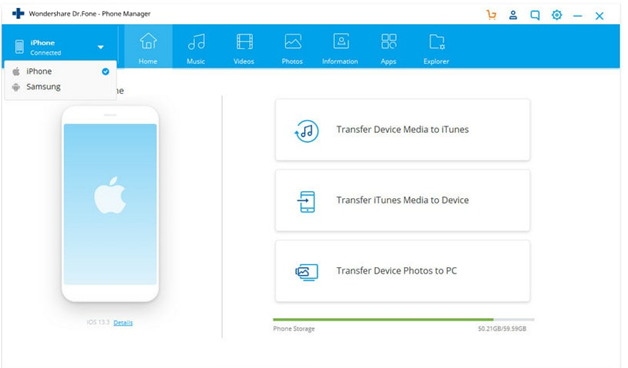
Step 1: Download the software Dr. Fone
Step 2: Now connect both the iPhones from which you need to transfer along with the one which is targeted with the laptop.
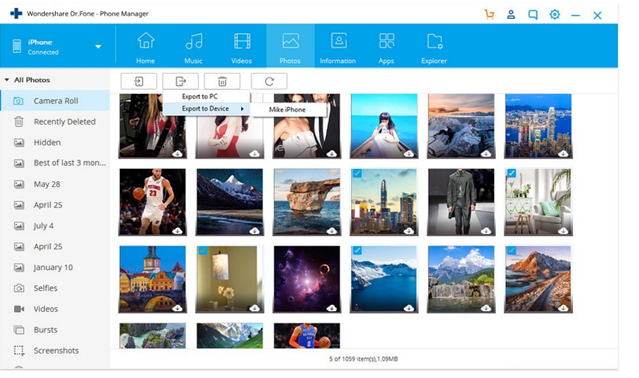
Step 3: After you have connected the iPhones select the “PHOTO TAB” present on the top of the screen and select the images you want to transfer from the source iPhone. You may select multiple images from multiple folders. Once you have selected the images select “EXPORT”. Soon after, a drop menu would appear in front of you and select “EXPORT TO DEVICE”, later on click the name of you targeted iPhone. After this all your selected images would be transferred to targeted iPhone without using iCloud.
Transfer photos from iPhone to iPhone without iCloud via iTunes:
Similar to iCloud iTunes is one of the Apple’s pre-installed application which is used to back up and sync iPhone data. In order to transfer photos from one iPhone to another all you need to do is back up photos from the source iPhone and sync it with the targeted one.
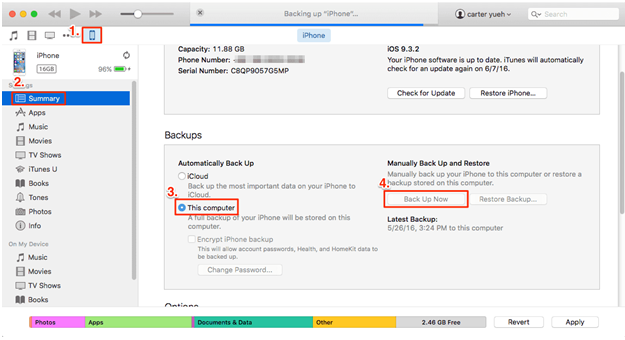
Back up photos from source iPhone using iTunes:
Step 1: Connect you source iPhone with your laptop and then run iTunes.
Step 2: Now click the iPhone device button that is present with in iTunes. You will able to find it easily.
Step 3: Later on you have to click “This computer" > "Back Up Now" > "Apply” in order to back up source iPhone to computer.
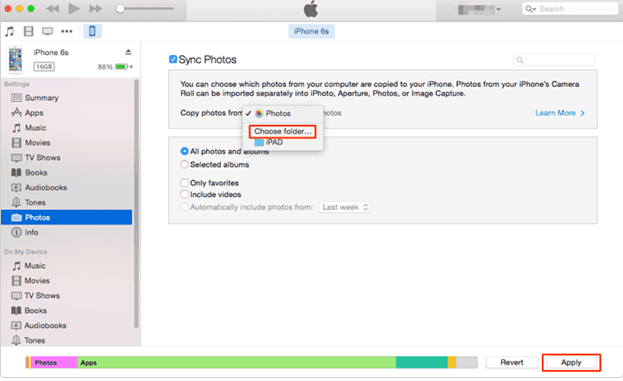
Transfer photos from iTunes to targeted iPhone using iTunes:
Step 1: Connect the targeted iPhone with laptop and plug out the source iPhone.
Step 2: Now click the iPhone device button that is present with in iTunes and select “Photos" > Tick "Sync Photos" > "Sync". All the photos will be then transferred to the targeted iPhone but here you need to have some patience while the transfer takes place. After some time all the photos would be transferred successfully.
How to transfer photos from iPhone to iPhone without using iCloud, but instead utilizing airdrop:
You can use airdrop to transfer photos from iPhone to iPhone within seconds only if you have iOS 7 or later. In case you have no idea how to open airdrop on your iPhone you need to simply launch Control Center by swiping up/down (iPhone X/XS/XR) on your iPhone or iPad > Long press on the Wi-Fi button >Tap AirDrop > Tap the "Contacts Only" or "Everyone" button to turn on Airdrop. Once you are done with it, follow these easy steps and carry out the process:
NOTE: Before moving towards the steps ensure that both you iPhones; targeted and source one have WI-FI and Bluetooth enabled.
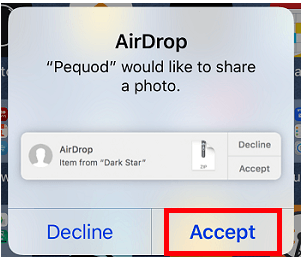
Step 1: From your source iPhone, go to the photos app and select all the photos you desire to shift.
Step 2: After you have selected them click on the "Share" button > Click "AirDrop" and select the targeted iPhone.
Step 3: On your targeted iPhone you would receive a notification and click “ACCEPT” and THAT’S ALL! all your photos would be transferred to the targeted iPhone.
WE ARE DONE HERE:
I’ve mentioned quite a time in my articles that technology has brought convenience into our lives but sometimes they turn out to be the most troubling gadgets and here is where our job starts. The respective article addresses the question that how to transfer photos from iPhone to iPhone without using iCloud, and provides not only one but multiple solutions and alternatives that you can effortlessly opt for.
In the comment section do let me whether you found this article beneficial enough? Moreover which way did you opt for to transfer you photos among iPhones?

.jpg)


What other's say about : How ThePhone thriller..