How to Transfer iPhone Pictures to Flash Drive
Dealing with the iPhone involves multiple complexities. It’s not easy to carry one, but its intriguing camera quality and certain features attract all of us towards it. I’m sure you are going to agree with me! There are many queries regarding iPhone and one of them is how to transfer iPhone pictures to flash drive?
In this article, I’m going to give you a detailed and elaborate guideline on how to transfer iPhone pictures to flash drive easily without getting worried. Therefore read the article till end to find easy and time saving ways to achieve your objective.
Unfortunately, we cannot exchange pictures straightforwardly from iPhone X/8/7/6S/6 (Also) to USB since iPhone does not bolster the association with a flash drive. In case you need to transfer your pictures to flash drive as a backup because you need to upgrade your system, or you need to free up some space or you need to share some of the pictures with your loved ones, how would you be able to that? Well, there are 2 simple solutions to this how! Either you can transfer your pictures to your computer first or you may directly transfer them into a flash drive, the choice is all yours!
Here are simple two methods:
1- Transfer pictures to flash drive directly through:
- Dr. Fone
- CopyTrans photo
2- Transfer your pictures firstly into your computer and then transfer them into a flash drive.
Method 1: how to transfer iPhone pictures to flash drive straightforwardly?
DR. FONE:
Dr.Fone - Phone Director (iOS), copies camera roll, photographs, collections, music, playlists, recordings, contact, message among Apple gadgets, computer and USB, moreover, iTunes could be reinforced without iTunes limitations. You'll be able to move all your iPhone pictures and collections to flash drive with only 3 simple steps.
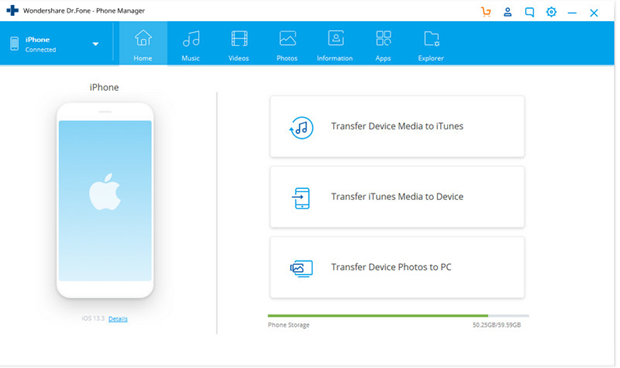
Step 1: download the phone manager, Dr. Fones, into your computer.
Once you have downloaded it, attach your iPhone X/8/7/6S/6 (Also) with your laptop using a USB cable, later on open the app. If the respective steps are achieved successfully, your phone would be detected and would be displayed on your laptop’s screen.
Step 2: Connect your flash drive with your laptop, in order to transfer your pictures from iPhone to the flash drive. When you will do so, the flash drive folder will be shown under “My Computers”, if you are using windows, whereas for Mac users, the USB streak drive will show up on your desktop. Just to be on the safe side, ensure that your flash drive is virus free so it may not affect your laptop. Furthermore, ensure that he USB has enough space to incorporate all the photos you need to transfer

Step 3: Finally, transfer photos to the Flash drive, once it is connected with your laptop. Now, select “photos” folder, which is present on Dr. Fone’s main window. IPhones will have their photographs spared in organizers: “Camera Roll”, “Photo Library”, "Photo Stream" and "Photo Shared". Let’s get into the insight of these folders, what they actually are for:
- Camera Roll stores photographs that you just captured using your phone.
- Photo Library stores photographs merely synced from iTunes. In the event that you have made personal organizers on your phone, they will too show up here.
- Photo Stream includes the photographs shared by the same iCloud ID.
- Photo Shared are the photographs shared with distinctive iCloud IDs.
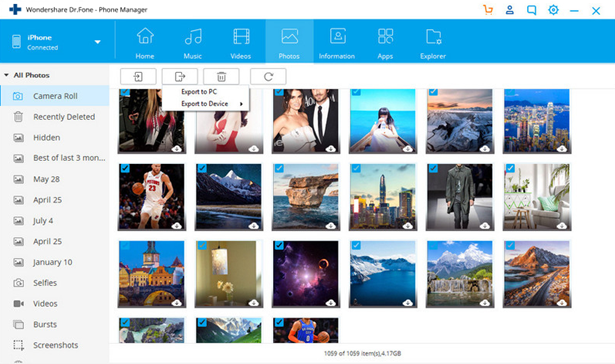
Now, Select the folder or the images that you simply want to transfer to your streak drive, and after that press the "Export" > “Export to PC” option, which is visible on the top bar. A pop-up window will appear, select your USB streak drive and click "Open" so that you can save the photos there. After you have made the reinforcement to your streak drive, to save your iPhone space, you may now delete all the images which are now backed up utilizing Dr Fone.
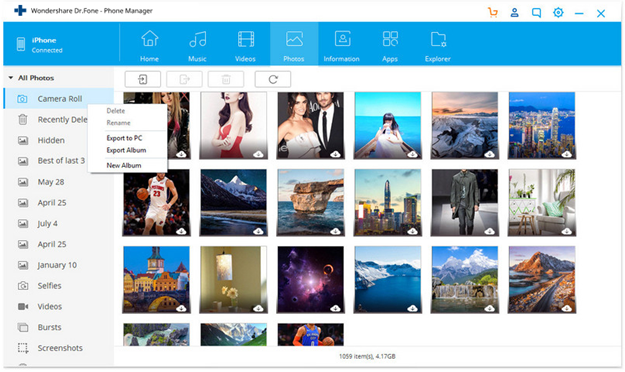
Oh wait! You can also transfer your pictures using one click! For that choose the folder which you would like to transfer and right click on it, then click “Export to PC”. Soon after that a pop would appear in front of you so you may select USB and click OPEN and then simply safe your pictures there.
Through Dr. Fone you can not only transfer pictures but you can also transfer music, files or documents to external drive, very easily.
You may transfer all your pictures from iPhone to the flash drive, straightforwardly using CopyTrans photo:
CopyTrans Photo:
You can easily transfer your photos following these simple steps:
1. Download and install CopyTrans .
2. Then connect your flash drive to the laptop and run CopyTrans photo. Now, connect your iPhone with your laptop.
3. Your screen will be divided into two portions and your iPhone files and folders would be shown on the left hand side, while your laptop’s folders would be visible on the right hand side of your screen
![]()
4. . Now select the flash drive folder from your right-hand side
![]()
5. From the left-hand side, select the photo collection or the photographs or recordings that you simply wish to exchange. To choose numerous photographs, press and hold CTRL on your keyboard whereas clicking on each photo or simply select them utilizing the mouse.
![]()
6. Now, Drag and drop the chosen set of photographs or recordings to the right side. You may also drag and drop whole folder if you want to.
![]()
7. Now click on apply changes and there you go!
![]()
8. Finally, after these simple and easy steps your desired photos and albums would be saved into your flash drive without any trouble.
![]()
Method 2: transfer your pictures from your iPhone first into your laptop and then into your flash drive:
Firstly, in order to transfer your pictures from your iPhone to your laptop there are two ways:
- In order to transfer pictures into windows laptop, use mail
- In order to transfer pictures from your iPhone into Mac, use photos app
EMAIL:
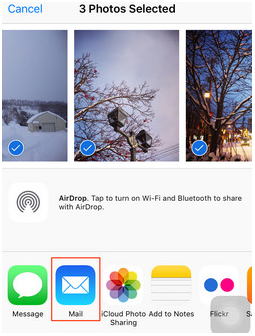
1. Firstly, Go to the photo application on your iPhone and launch it.
2. Now, select the photos you want to transfer and you may select more than one photo, but sadly, you can only select up to 5 photos.
3. After you select them, then press SHARE and then choose, MAIL, which will take you to another window pop up of email with the photos you selected to attach. Now enter the email address you want to send your photographs to.
4. Access your email account on the computer. For Gmail users, your email will have thumbnails of the images at the bottom of your message. Click it to download the photo. For Yahoo users, the attachment download option is at the top, just click Download All to save all attachments at one time

5. The images would be downloaded in the download folder

PHOTOS APP:
Unfortunately, if you are using an older version of mac, then you would not be having an updated photos app, while an older one. But, don’t worry, you can still transfer your pictures via following steps:
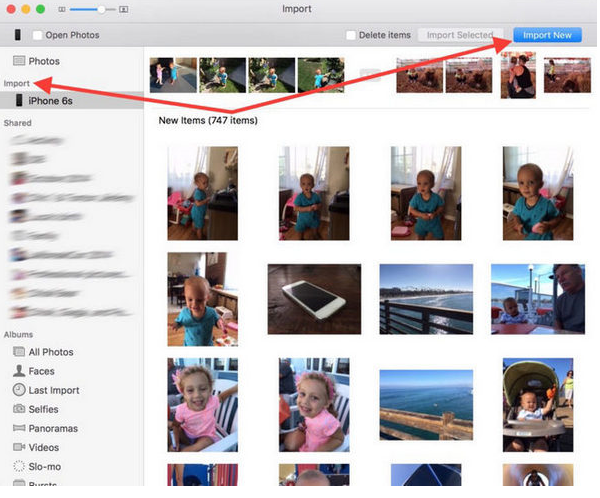
1. Using a USB cable, connect your iPhone with your mac
2. Photos app would be automatically opened once your phone connects.
3. Now, select he photos that you want to transfer to your Mac, and select, “Import Selected,” (if you just want to transfer some photos) or select “Import New” (All New Items).
4. Once the process of transferring has been done, iPhoto will list all the Events and Photos on the screen in chronological order, and you can easily find some photos and move them to some folder of your Mac. Tragically, with iPhoto, you only can transfer Camera Roll photos from iPhone to Mac, if you also want to transfer photos in other albums like Photo Stream, Photo Library, you can move to email method.
TRANFER PICTURES FROM YOUR LAPTOP TO FLASH DRIVE:
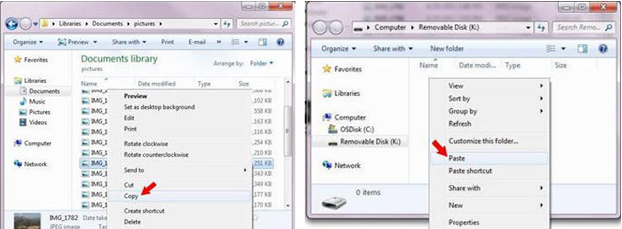
- In order to transfer the pictures to your flash drive, insert the drive into your computer and do remember to ensure two thing; it is virus free and it has enough space to incorporate your pictures
- Select the photos from your PC now and right click, now click COPY.
Finally, open the flash drive and right click and click PASTE to transfer all your pictures.
BOTTOM LINE:
IPhone is technical to use and sometimes one finds himself/herself stuck in awkward situations but we are always here to help you. Let’s have a quick recap on how to transfer iPhone pictures to flash drive:
To do so, there are two ways:
- To transfer them directly via; Dr. Fone or CopyTrans.
- To transfer them firstly into your computer and then into your flash drive.
Both the ways are easy and involve simpler steps but I’d live to know which method you think is more convenient and easy. Do tell me, which method you opted for and also do share it with your friends and beloved ones to keep them from struggle.

.jpg)

What other's say about : How ThePhone thriller..